Today I tried to configure SD card library and run examples on olimexino stm32. This will use the microSD card slot on board. You can read more about micro SD card on Wikipedia here.
Maple IDE can be used to program the board. Download Maple IDE.
I downloaded SDCARD library and examples - Maple SDCARD_Lib + Examples MapleIDE leaflabs forums.
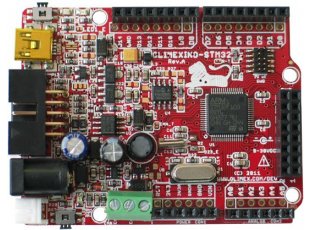
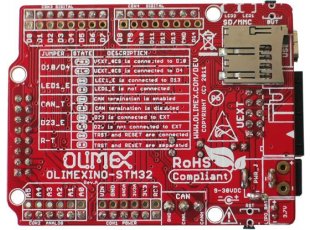
I used a Sandisk micro sdcard of 2GB and inserted it into the card slot at the back of the board.
Lets start with an example. I fired the Maple IDE. Then selected the my first example by selecting File -> Examples -.SdFat -> MapleExamples -> SDFatInfo.

As easy as it gets I pressed Ctrl+R key to compile the code. When the example code is compiled it also compiles the library files.
Then pressed Ctrl+U to upload the code to the maple Olimexino stm32 board.
Once the code is uploaded then to see the card information on the serial port in Maple itself select Tools -> Serial port or Ctrl+Shift+M keys to open Serial Monitor window.
In the text bar next to 'Send' button entered a character (I pressed 'a') and clicked 'Send'.

I could see lots of card info. How simple. And I have not done any coding for sdcard yet:).
So as a next step I wanted to see the above info on Microsoft HyperTerminal instead of the Maple build in Serial Monitor.
So I closed the Serial monitor window, and opened HyperTerminal. Opened a new connection, gave a name for the connection, selected the com port where the stm32 board is connected, selected the baud rate as per the settings shown in the figure here.

Then when connected pressed any key("a") in my case on the keyboard.
Here is the output.
Now that I get card info, I tried a few examples for file read and write already in the SDCard library and examples for Maple that we download earlier. I found a simple example to write file and read a file on a microSD Card.
I fired my Maple IDE. Then started the example by selecting File -> Examples -.SdFat -> SDClass -> ReadWrite.
Compiled the code (Ctrl+R), then uploaded firmware to stm32 board (Ctrl+U).
Fired my HyperTerminal at 115200 baud rate. Pressed a key on the keyboard and got the following output

It shows that initialization of SDCard was done successfully, write to file test.txt was successful. The read back of file contents and display on the serial port is also complete.
That was so easy to read and write to a SDCard. Now I can write my own programs to use SD library and examples. There are lots of other examples available in the library and should be easy to to implement modify in any application.
This blog is not meant to be a manual so if you find any mistakes please point out to me. If any one has any comments/feedback please post. Also if you find the information useful please link to my blog.
Over the next few blogs I will be writing on using temperature sensors and XBEE's. I am also looking at Jeenode and Seeeduino Stalker v2.3
Maple IDE can be used to program the board. Download Maple IDE.
I downloaded SDCARD library and examples - Maple SDCARD_Lib + Examples MapleIDE leaflabs forums.
I download the files from the above link. Unzipped the files to a folder and copied the two unzipped folders to the /libraries/ folder in my Maple IDE installation folder. There is a readme.txt file in the unzipped folder.
Sdcard I used is in fat16 format.How to Format a Fat16 SD CardI used a Sandisk micro sdcard of 2GB and inserted it into the card slot at the back of the board.
Lets start with an example. I fired the Maple IDE. Then selected the my first example by selecting File -> Examples -.SdFat -> MapleExamples -> SDFatInfo.

As easy as it gets I pressed Ctrl+R key to compile the code. When the example code is compiled it also compiles the library files.
Then pressed Ctrl+U to upload the code to the maple Olimexino stm32 board.
Once the code is uploaded then to see the card information on the serial port in Maple itself select Tools -> Serial port or Ctrl+Shift+M keys to open Serial Monitor window.
In the text bar next to 'Send' button entered a character (I pressed 'a') and clicked 'Send'.
I could see lots of card info. How simple. And I have not done any coding for sdcard yet:).
So as a next step I wanted to see the above info on Microsoft HyperTerminal instead of the Maple build in Serial Monitor.
So I closed the Serial monitor window, and opened HyperTerminal. Opened a new connection, gave a name for the connection, selected the com port where the stm32 board is connected, selected the baud rate as per the settings shown in the figure here.

Then when connected pressed any key("a") in my case on the keyboard.
 |
Now that I get card info, I tried a few examples for file read and write already in the SDCard library and examples for Maple that we download earlier. I found a simple example to write file and read a file on a microSD Card.
I fired my Maple IDE. Then started the example by selecting File -> Examples -.SdFat -> SDClass -> ReadWrite.
Compiled the code (Ctrl+R), then uploaded firmware to stm32 board (Ctrl+U).
Fired my HyperTerminal at 115200 baud rate. Pressed a key on the keyboard and got the following output

It shows that initialization of SDCard was done successfully, write to file test.txt was successful. The read back of file contents and display on the serial port is also complete.
That was so easy to read and write to a SDCard. Now I can write my own programs to use SD library and examples. There are lots of other examples available in the library and should be easy to to implement modify in any application.
This blog is not meant to be a manual so if you find any mistakes please point out to me. If any one has any comments/feedback please post. Also if you find the information useful please link to my blog.
Over the next few blogs I will be writing on using temperature sensors and XBEE's. I am also looking at Jeenode and Seeeduino Stalker v2.3
